My Second Homebrew
I loved brewing beer so much that I just had to do a second homebrew. With my first homebrew I followed the recipe to the T. With this recipe I did some experimenting, if only just with the sugar used for priming. I got some new equipment to help with some of the lessons I learned earlier. While more, very important lessons were learned with this homebrew. Read all about my experience below!
American Wheat Ale
New Equipment: 8 gallon kettle and large stirring spoon
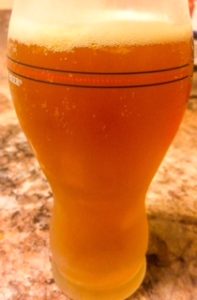
My second homebrew of an American Wheat Ale.
Ingredients
Grains:
None
Malts:
6 lbs Wheat Malt Syrup
Hops:
1 oz Willamette
1 oz Cascade
Yeast:
Safale US-05 Ale Yeast
Brew Day – 6 hrs
When brewing day finally came around, I was excited to try out my new kettle. The clean up involved from the overflow with my small kettle was brutal. To prepare I cleaned the kettle and spoon and started bringing 5 gallons and 1 cup to a boil. While this was boiling, I cleaned and sanitized the measuring cup, fermenting bucket, lid, and airlock. I then heated water in the sink and warmed up the malt extract syrup so it would pour easier. Next, I waited for the 5 gallons to come to a boil.
Waited, and waited, and waited… This brew day took 6 hours total, 2 and a half were waiting for the water to boil. At 2 and a half hours, with only small indications of the water trying to boil, I decided to change paths. I poured 2 gallons of the water into the fermenting bucket and 1 cup into the measuring cup. The remaining 3 gallons were then quickly brought to a boil and brew day continued. Once boiling, I removed the kettle from the heat, added the malt extract, and returned to the heat. I brought the wort back to a boil, added the Willamette hops, and set a timer for 60 minutes. Stirring occasionally, I then added the Cascade hops with 15 minutes left in the timer.
Adding the Yeast
When the timer went off, I moved the wort into my small kettle from my last homebrew and placed it into the freezer to cool down. While the wort was cooling I added the yeast to the water in the measuring cup, covered, and let sit for 15 minutes. After 15 minutes, I stirred the yeast in the measuring cup, then recovered and let sit for 15 minutes. After the wort was cooled to below 80°F I poured it into the fermenting bucket. I then transferred the wort back and forth between the kettle and fermenting bucket to aerate it. The yeast was then pitched in the wort and the fermenting bucket was shaken up to mix the yeast in. The lid was put on and the airlock placed in the bung. I then placed the fermenting bucket where it would be stored during fermentation.
Fermentation
If you read my first homebrewing experience, you would know that I dropped the ball on carefully observing the fermentation process. Well, I did it again. I did manage to go a couple of more hours this time but not by much. I promise to be better in the future! With this brew I continued the trend of observing how frequently the airlock bubbled, the temperature reading, and the smell of yeast.
Observation Log
4.5 hours: Airlock bubbling slowly, approximately 1 bubble per 22 seconds. Fermenter temperature gauge reading at 82°F with a strong smell of yeast.
7.5 hours: Airlock bubbling continuously, approximately 1 bubble per 3 seconds. Fermenter temperature gauge reading at 80°F with a strong smell of yeast.
22 hours: Airlock bubbling continuously, approximately 1 bubble per 2 seconds. Fermenter temperature gauge reading at 76°F with a strong smell of yeast.
1 day 1 hour: Airlock bubbling slowly, approximately 1 bubble per 6 seconds. Fermenter temperature gauge reading at 74°F with a strong smell of yeast.
1 day 8 hours: Airlock bubbling slowly, approximately 1 bubble per 11 seconds. Fermenter temperature gauge reading at 74°F with a strong smell of yeast.
1 day 15.5 hours: Airlock bubbling slowly, approximately 1 bubble per 18 seconds. Fermenter temperature gauge reading at 72°F with a strong smell of yeast.
2 days 2.5 hours: Airlock bubbling slowly, approximately 1 bubble per 5 seconds. Fermenter temperature gauge reading at 72°F with a strong smell of yeast.
2 days 8.5 hours: Airlock bubbling slowly, approximately 1 bubble per 4 seconds. Fermenter temperature gauge reading at 70°F with a strong smell of yeast.
2 days 19.5 hours: Airlock not bubbling. Fermenter temperature gauge reading at 68°F with a mild smell of yeast up close.
4 days: Airlock bubbling slowly, approximately 1 bubble per 22 seconds. Fermenter temperature gauge reading at 66°F with no smell of yeast.
4 days 20.5 hours: Airlock bubbling very slowly, approximately 1 bubble per 43 seconds. Fermenter temperature gauge reading at 66°F with a mild smell of yeast.
Bottling
I used recycled bottles for this homebrew as well. I can’t wait to get a draught system. The sinks were cleaned and then filled with soapy water. I cleaned and sanitized the siphon, bottling bucket, tubing, bottles, and bottle caps. 2 cups of water and 4 ozs of cane sugar were brought to a boil. In my first homebrew I used 5ozs and the carbonation was a little too much, so I adjusted this. I boiled this for 7 minutes and set it aside to cool. After cooling the priming solution, I poured it into the bottling bucket. I then siphoned the beer into the bottling bucket and stirred the bottling bucket gently. Lastly, I siphoned the beer into bottles, capped the bottles, and stored in a cool, dry place for two weeks.
Thoughts
The first time I tasted my second home brew, it was a couple of sips with a group of my friends. The beer had a good carbonation level and nice golden look. It went down smooth and had a good, clean taste to it. I was excited to drink the rest of the beers at this point. The next time I had one of the beers, I drank a whole one. A little while after drinking the beer, I had to go to the bathroom. I pushed it off as some other food and decided to try another one. After drinking another one, I was back in the bathroom, and the same after the third beer I had. Unfortunately, I determined that there was some sanitation issues with the beer and had to dump the rest of the beers.
My friend Dan said that it was a clean beer and tasted good. He had tried both of my beers and thought that I really had a knack for brewing.
Lessons Learned
The first major lesson I learned from this experience is that stove tops are not powerful enough to boil 5 gallons of water. After 2 and a half hours of waiting for water to boil, I determined that my next purchase should absolutely be a propane burner.
The second major lesson I learned from this experience is that sanitation plays a major role in brewing. Looking back there seems to be a couple of different places where I might have messed up the sanitation. Using water that I hadn’t fully boiled, might have played a role. Putting the kettle in the freezer to cool the wort is a second issue that might have played a role. The third reason I can think of might have been some leftover sanitation solution in the bottles when I filled them with beer. Either way, I had issues with sanitation and had to pour over 45 beers down the drain. I hope to never have sanitation issues again.
Let me know about your homebrewing experience in the comments below! Notice something that I can change to improve my brews in the future? Let me know below! Be sure to follow my social media and sign up for my newsletter to stay up to date on my adventures!
0 Comments